一、Vue2
01 - 使用
- 使用
script标签引入:
// 开发环境
<script src="https://cdn.jsdelivr.net/npm/vue@2.7.10/dist/vue.js"></script>

// 生产环境
<script src="https://cdn.jsdelivr.net/npm/vue@2.7.10"></script>
- 使用 npm 配合打包工具:
npm install vue - npm 标签及版本:
@latest,默认标签,最近更新的@next,下一个大版本@alpha,内测版@beta,公测版@rc,候选版
指令:
<!-- 所有的数据绑定都支持JS单个表达式的解析,如简单计算、三元表达式、字符串数组的方法... -->
<!-- 指令 attribute 冒号后的参数,可以使用 [...] 绑定为动态参数,需要对参数值做约束 -->
<!-- 缩写仅在有参数的时候有效 -->

<... is></...>

<!-- 列表渲染 -->
<... v-for="item in items" :key="..."></...>
<... v-for="(item, index) in items" :key="..."></...>
<!-- 对象按照 Object.keys() 遍历 -->
<... v-for="value in object" :key="..."></...>
<... v-for="(value, name, index) in object" :key="..."></...>
<!-- 利用计算属性渲染过滤后的数据,当在嵌套 v-for 不适用的情况下可以利用方法过滤 -->
<!-- 将模板重复对应的次数 -->
<... v-for="n in 10">{{ n }}</...>
<!-- 列表渲染分组 -->
<template v-for="...">...</template>

<!-- 条件渲染 -->
<!-- 不推荐与 v-for 一起使用, v-for 的优先级高 -->
<... v-if="..."></...>
<... v-else-if="..."></...>
<... v-else></...>
<!-- 条件渲染分组 -->
<template v-if>...</template>
<!-- v-show 元素会始终渲染并且保留在 DOM 中,只是切换元素 CSS 的 display,不支持 template -->
<!-- 适用于需要频繁切换时 -->
<... v-show="..."></...>
<!-- v-cloak 保持在元素上直到关联实例结束编译 -->

<!-- v-pre 跳过这个元素和它的子元素的编译过程 -->
<!-- 一次性插值 -->
<... v-once></...>

<... id></...>

<!-- 使用 key 让元素独立 -->
<... key="..."></...>
<... ref></...>

<!-- 表单输入绑定:双向数据绑定 -->
<!-- 忽略所有表单元素的 value、checked、selected attribute 的初始值而总是将 Vue 实例的数据作为数据来源,在 data 选项中声明初始值 -->
<... v-model="..."></...>
<!-- 多个复选框绑定到同一个数组 -->
<!-- 选框选中时,v-model的值为 value 的值或 true false -->
<!-- 修饰符:.lazy .number .trim -->

<!-- 其他 attribute -->
<!-- 动态绑定一或多个 attribute -->
<... v-bind:attribute="..."></...>
<!-- 支持缩写 -->
<... :attribute="..."></...>
<... :[...]="..."></...>
<!-- 用于 class 和 style 时,做了增强除了字符串外还支持了对象或数组 -->
<!-- 建议直接将对象写在 data 中;也可以绑定计算属性 -->
<... :class="{active: isActive}" class="支持共存"></...>
<... :style="{color: ...(取值是data里的同名属性), 'font-size': ...}"></...>

<!-- 事件处理 -->
<!-- 事件监听器 -->
<... v-on:event="..."></...>
<!-- 支持修饰符,prevent 对于触发事件调用 event.preventDefault() -->
<!-- .stop .prevent .capture .self .once .passive -->
<... v-on:event.prevent="..."></...>
<!-- 按键修饰符,只有按键为 enter 时才触发 -->
<input v-on:keyup.enter="...">
<!-- 仅在按下如下键才触发鼠标或键盘事件的监听器:.ctrl .alt .shift .meta -->
<!-- 鼠标按钮修饰符:.left .right .middle -->
<!-- .exact 精确控制触发条件,仅当按下唯一的键时触发 -->
<!-- 支持缩写 -->
<... @event="..."></...>
<... @[...]="..."></...>

<!-- 插入 HTML -->
<... v-html="..."></...>

<!-- 声明式渲染 -->
{{ ... }}
<!-- 等价于上面的方式 -->
<... v-text="..."></...>
创建:
// 创建 Vue 实例
var vm = new Vue({
  // --- 副作用(触发组件外的影响) ---
  el: "#...",  // 设置绑定的 DOM 对象

  // --- 模板依赖(使用到的资源) ---
  components: { '...': ... },  // 注册局部组件
  directives: {  // 注册局部指令
    指令名: {
      ...
    }
  },
  filters: {...},  // 注册局部过滤器

  // --- 组合(向选项里合并 property)
  extends: { ... },  // 扩展/继承
  mixins: [],  // 混入对象

  // --- 接口 ---
  propsData: { ... },  // 向组件的 props 传递数据,主要用于测试

  // --- 本地状态(本地的响应式 property)---
  // 数据属性,所有的 property 加入到 Vue 的响应式系统中
  // 只有创建时存在的 property 是响应式的
  // Object.freeze(对象),冻结对象,使响应式系统无法追踪变化
  // 组件中的 data 只接受 function
  data: { ... },
  // 计算属性
  // 基于响应式依赖进行缓存,仅在依赖项改变时重新计算
  // 默认只有 getter,也可以提供 setter
  computed: {
    ...: function() {
      return this....
    }
  },

  // --- 事件(通过响应式事件触发的回调) ---
  // 侦听属性
  // 适用于数据变化时执行异步或开销较大的操作
  watch: {
    ...: function(new..., old...) { ... }
  },
  // 生命周期钩子(函数)
  beforeCreate: function() { ... },  // 创建之前执行
  created: function() { ... },  // 创建之后执行
  beforeMount: function() { ... },  // 挂载之前执行
  Mounted: function() { ... },  // 挂载之后执行
  beforeUpdate: function() { ... },  // 更新之前执行
  updated: function() { ... },  // 更新之后执行
  activated: function() { ... },  // 被 keep-alive 缓存的组件激活时调用
  deactivated: function() { ... },  // 被 keep-alive 缓存的组件失活时调用
  beforeDestroy: function() { ... },  // 实例销毁前执行
  destroyed: function() { ... },  // 销毁后执行
  errorCaptured: function() { ... }, // 捕获到后代的错误之后执行

  // --- 非响应式的 property ---
  methods: { ... },  // 方法
})
组件基础:
- 一个组件本质上是一个拥有预定义选项的一个 Vue 实例。
// 全局注册
Vue.component('todo-item', {
  // prop 类似于一个自定义的 attribute,可以将父作用域的数据传到子组件上,起到桥梁作用
  props: ['foo', 'value',...],
  // data 必须是一个函数,保证组件数据的独立
  data: function() {
    return { ... }
  },
  template: '
   // 每个组件必须只有一个根元素
   <div class="todo-item">
     <div>{{foo.xxx}}</div>
     // 触发自定义事件,将该事件传递到父级组件处理,第二个事件可以用于抛出值(可选)
     <button v-on:click="$emit('enlarge-text', n)">按钮</button>
     // 使用 v-modle
     <input v-bind:value='value' v-on:input='$emit('input', $event.target.value)'>
     // 插槽
     <slot></slot>
   </div>
  '
})

var app = new Vue({ ... })

//----------------------------
<todo-item
 v-for="(item, index) in items"
 :foo="item"
 :key="item.id"
 :index="index"
 // 监听自定义事件并处理,$event 访问抛出的值(可选);事件处理是一个方法,则抛出的值用第一个参数接收
 @enlarge-text="... $event"
 //
 v-modle='searchText'
>
  // 内容将会插入插槽中
  Something bad happened.
  // 注入依赖,使用 provide 提供给后代的方法/数据
  <... inject: [...]></...>
</todo-item>
// 在自定义组件上使用 class 时,会添加到该组件的根元素上,已存在的不会被覆盖
// 组件会在 `currentTabComponent` 改变时改变,is="..." 可以用于有约束条件的元素的内部使用组件
// 切换时组件会重新渲染,不会保存状态
<component v-bind:is="currentTabComponent"></component>
深入组件:
// 全局注册
Vue.component('my-component-name', {
  // --- 全局感知 ---
  name: String,  // 递归的调用自身
  parent: Vue instance,  // 建立父子关系

  // --- 组件类型 ---
  functionla: true,  // 开启函数式组件,组件无状态(data)无实例(this 上下文)

  // --- 模板修改器 ---
  delimiters: ['${', '}'],  // 改变纯文本插入分隔符
  comments: true,  // 保留 HTML 注释

  // --- 接口 ---
  // 禁止根元素继承 没有被prop 的attribute,不影响 class style
  inheritAttrs: false,
  // 组件上的 v-model 会默认利用名为 value 的 prop, 和名为 input 的事件
  // 单选 复选框类型 使用 v-modle时
  // 定制 prop, event
  model: {
    prop: 'checked',
    event: 'change',
  },
  // props 除了字符串数组,还可以是对象并指明值的类型用于验证
  // 没有 prop 的 attribute 会自动添加到组件的根元素上
  // 父级传入的 attribute 大多会替代子存在的,class style 则会合并
  props: {
    checked: Boolean,

    title: String,
    likes: Number,
    isPublished: [Boolean, Number],  // 可能多个
    callback: Function,
    propA: {
      type: String,  // 设置类型:String Number Boolean Array Object Date Function Symbol 构造函数
      required: true,  // 设置必填
    },
    propB: {
      type: Number,
      default: 100,  // 设置默认值
    },
    // 设置对象的默认值必须从工厂函数中获得
    // 设置带有返回值的验证函数
    ....
  },

  // --- 本地状体 ---
  data: function() { ... },
  computed: { ... },

	// --- 渲染 ---
	render(h, [context]) { ... },  // 渲染函数,存在会忽略上面的字符串模板
	renderError(h, err) { ... },  // 渲染出错时
  template: '
    <div class="root">
     // 默认没有被 props 接收的 attribute 会被根元素继承,关闭继承后,使用 $attrs 接收使用
     <input v-bind="$attrs">
       <input type="checkbox" v-bind:checked="checked" v-on:change="$emit('change', $event.target.checked)"
       // 插槽,渲染时插槽会被替换为组件标签内写的内容
       <slot></slot>
       <button type="sumbit">
       <slot>后备内容</slot>
       </button>
       // 具名插槽
       <header>
       <slot name="header"></slot>
       </header>
       // 作用域插槽 让父级插槽的内容可以访问到当前作用域
       <span>
       // 插槽 prop,内部实现为拥有单个参数的函数
       <slot v-bind:title="title"></slot>
       </span>
    </div>
    '
  	// 在祖先组件里提供
  	provide: { ... },
  	// 在子孙组件里注入
  	inject: ['...'],
  })

// 局部注册
// 局部注册的组件在其子组件中不可直接用,需要引入
// require.context() 常用于全局引入大量公共组件
var ComponentA = { ... }

new Vue({
  components: {
    'component-a': ComponentA,
  }
})

// ------------------------------------------------
// 父级模板里的内容都是在父级作用域中编译的,子模板的所有内容都是在子作用域中编译的
// 将一个对象的所有 property 都作为 prop 传入
// props 是单向下行数据绑定的
<my-component-name
 // 绑定多个 prop
 v-bind="带有props设置内容的对象"
 // 监听根元素的事件
 v-on:focus.native="onFocus"
 // 利用事件模拟数据的双向绑定的修饰符写法
 v-bind:title.sync="xxx.title"
>
  // 插槽内容任意,可以文本 HTML、其他组件
  // 组件位设置插槽 将会抛弃其中的内容
  Your Profile

  // 插入具名插槽中 v-solt 要加在 template 上
  <template v-solt:header>
  <h1>Header</h1>
  </template>

  // 作用域插槽
  // 为插槽prop的对象起名
  // 支持 [] 动态插槽名
  <template v-solt:default="slotProp">
  // 支持缩写
  <template #:default="slotProp">
   {{slotProp.title.xxx}}
  </template>
</my-component-name>
// 动态组件
// 失活的组件将会被缓存
<keep-alive>
  <component v-bind:is="..."></...>
</keep-alive>

// 异步组件,设置一个工厂函数,分割为小一些的代码块,需要时从服务器下载
建议顺序:
// --- 副作用 ---
el: "#...",

// --- 全局感知
name: String,
parent: Vue instance,

// --- 组件类型 ---
functionla: true,

// --- 模板修改器 ---
delimiters: ['${', '}'],
comments: true,

// --- 模板依赖 ---
components: { ... },
directives: { ... },
filters: { ... },

// --- 组合 ---
extends: { ... },
mixins: [],

// --- 接口 ---
inheritAttrs: false,
model: {
  prop: 'checked',
  event: 'change',
},
props: { ... },

// --- vuex 状态 ---
store: store,

// --- 本地状态 ---
data: { ... },
computed: { ... },

// --- 事件 ---
watch: {
  ...: function(new..., old...) { ... }
},
beforeCreate: function() { ... },  // 创建之前执行
created: function() { ... },  // 创建之后执行
beforeMount: function() { ... },  // 挂载之前执行
Mounted: function() { ... },  // 挂载之后执行
beforeUpdate: function() { ... },  // 更新之前执行
updated: function() { ... },  // 更新之后执行
activated: function() { ... },  // 被 keep-alive 缓存的组件激活时调用
deactivated: function() { ... },  // 被 keep-alive 缓存的组件失活时调用
beforeDestroy: function() { ... },  // 实例销毁前执行
destroyed: function() { ... },  // 销毁后执行
errorCaptured: function() { ... }, // 捕获到后代的错误之后执行

// --- 非响应式 property ---
methods: { ... },

// --- 渲染 ---
render(h, [context]) { ... },
renderError(h, err) { ... },
template: ' ... '
过渡动画:
// 默认渲染为 <span>
<transition
 // 更换渲染的标签
 tag="p"
 // 默认前缀为 v- 使用name 可以替换 v-
 name="fade"
 // 自定义过渡类名
 enter-active-class="animated-tada"
 leave-active-class="animated ..."
 // 显性规定过渡的时间
 :duration="1000"
 // 规定进入和移出的时间
 :duration="{ enter: 500, leave: 800 }"

 // 声明 JS 钩子
 v-on:before-enter="beforeEnter"
 v-on:enter="enter"
 v-on:after-enter="..."
 v-on:enter-cancelled="..."

 v-on:before-leave:"..."
  ...

 // 设置初始渲染的过渡
 appear
 appear-class="..."
 appear-to-class="..."
 appear-active-class="..."
 v-on:before-appear="..."
 v-on:appear="..."
  ...

  // 过渡模式
  // 新元素先进行过渡之后当前元素离开
  mode="in-out"
  // 当前元素先进行过渡,完成之后新元素过渡进入
  mode="out-in"

  // 多个组件的过渡 使用 is 动态组件
>
  ...
</transition>

// v-for 的列表进入与离开过渡
<transition-group ...>
    ...
</transition-group>

//-----------CSS-------------
.fade-enter { ... }
.fade-enter-active { ... }
.fade-enter-to { ... }
.fade-leave { ... }
.fade-leave-active { ... }
.fade-leave-to { ... }
// 控制位移的过渡
.fade-move { ... }

//---------JS------------
methods: {
  beforeEnter: function (el) {
    el.style.opacity = 0
    el.style.transformOrigin = 'left'
  },
  enter: function (el, done) {
    Velocity(el, { opacity: 1, fontSize: '1.4em' }, { duration: 300 })
    Velocity(el, { fontSize: '1em' }, { complete: done })
  },
  leave: function (el, done) {
    Velocity(el, { translateX: '15px', rotateZ: '50deg' }, { duration: 600 })
    Velocity(el, { rotateZ: '100deg' }, { loop: 2 })
    Velocity(el, {
      rotateZ: '45deg',
      translateY: '30px',
      translateX: '30px',
      opacity: 0
    }, { complete: done })
  }
}

// 通过侦听器 监听数据的变化 调用过渡动画
// 可以把状态过渡封装在组件里
复用性:
// 混入 mixin 提升组件的复用性
// 定义一个混入对象
var myMixin = {
  // 可以包含任意选项
  ...
}
// 定义一个使用混用对象的组件
var Component = Vue.extend({
  mixins: [myMixin]
})
var component = new Component()
// 混入对象会和原组件的数据和方法进行合并,重复项以原组件优先,方法将合并为一个数组均可调用
// 全局混入
Vue.mixin({ ... })
// 可自定义合并策略

//-----------------------------

// 自定义全局指令 v-focus
Vue.directive('focus', {
  // 当被绑定的元素插入到 Dom 时
  inserted: function(el) {
    el.focus()
  },
  // 支持众多钩子函数,去定义指令的功能
  // 支持传入对象字面量
})

//-----------------------------
// 渲染函数 render
Vue.component('anchored-heading', {
  render: function(createElement) {
    return createElement{
      // 第一个参数:标签名字符串、组件选项对象、函数
      'h' + this.level, // 标签名称
      // 可选,数据对象 class\style\slot\attrs...
      // this.$slots 访问静态插槽的内容
      // this.$scopedSlots.具名
      this.$slots.default, // 子节点数组(内容)
      // 可选,子级虚拟节点 VNode
    }
  },
  props: {
    level: {
      type: Number,
      required: true,
    }
  }
})

// VNode 必须是唯一的
// v-for v-if 都可以在 render 中原生实现
// 修饰符 .passive 等可以用前缀 & 代替
// 将 h 作为 createElement 的别名是 Vue 生态系统中的一个通用惯例,实际上也是 JSX 所要求的

// 函数式组件
Vue.component('my-component', {
  functional: true,
  // 可以省略 props

  // 组件需要的一切都是通过 context 参数(是一个对象)传递
  render: function(createElement, context) {
    //
  }
})

// 模板实际上被编译为了渲染函数

//------------------------------------------
// 插件,通常为 vue 提供全局功能
// 官方插件:vue-router ...
Vue.use(MyPlugin, { 可选对象 })

new Vue({ ... })
// 开发插件要暴露一个 install 方法

//-------------------------------------------
// 过滤器,可以应用在双花括号插值和 v-bind 表达式
// 过滤器可以串联,可以传入参数
// 在双花括号中
{{ message | capitalize }}

// 在 `v-bind` 中
<div v-bind:id="rawId | formatId"></div>

// 过滤器属性
filters: {
  capitalize: function (value) {
    if (!value) return ''
    value = value.toString()
    return value.charAt(0).toUpperCase() + value.slice(1)
  }
}

// 定义全局过滤器
Vue.filters('...', function() { ... })
工具:
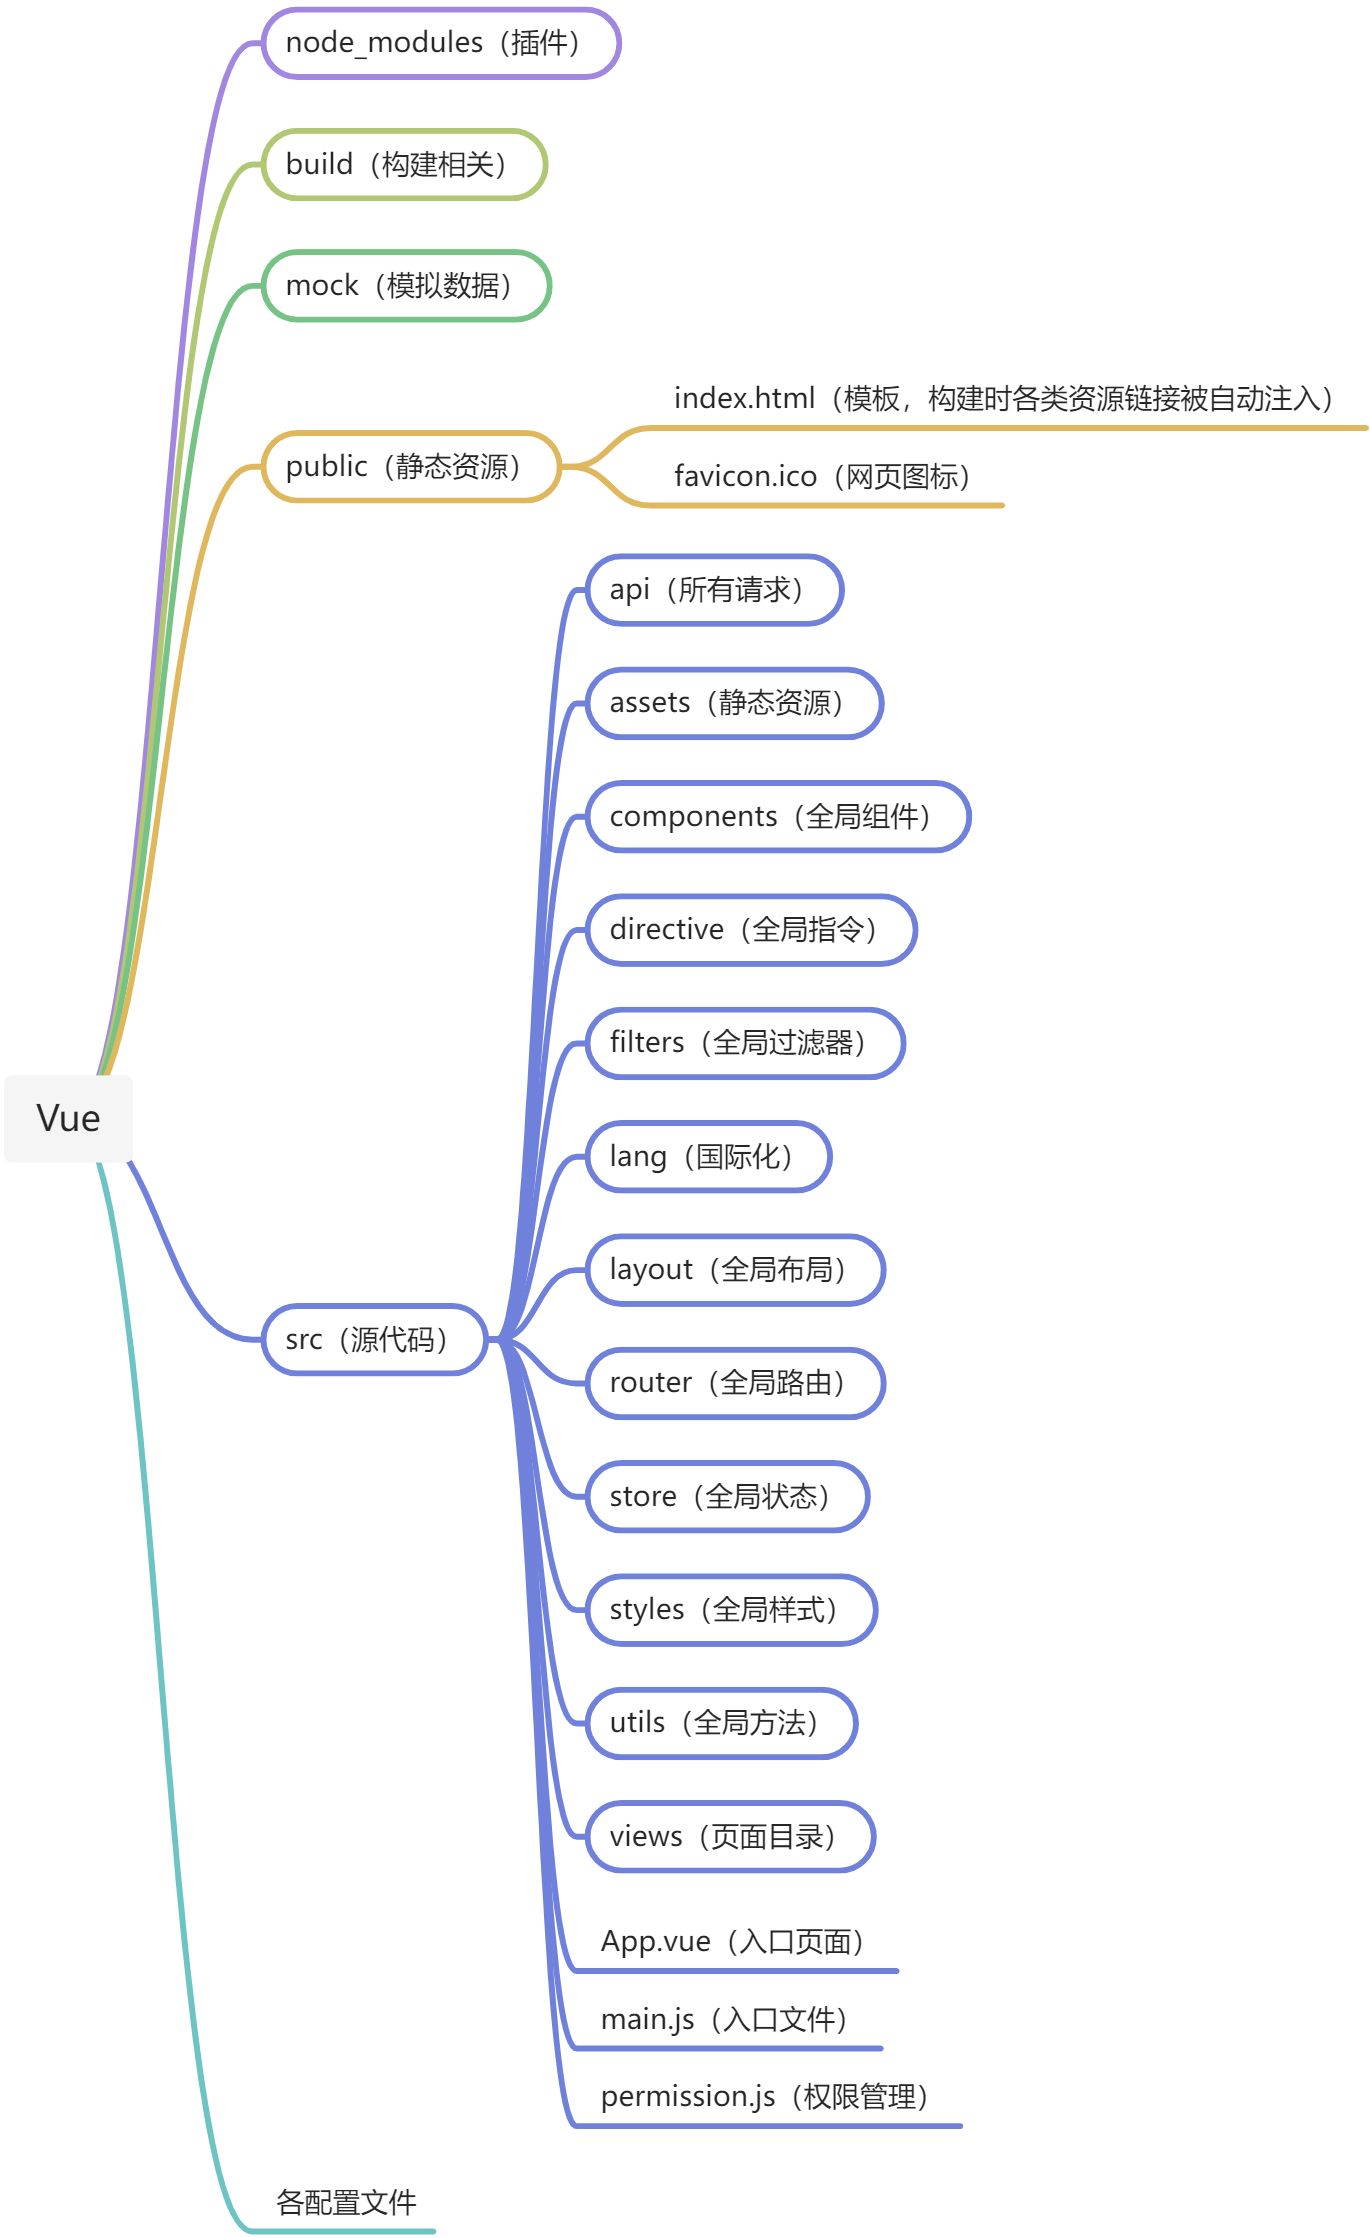
// 单文件组件
<template>
	...
</template>

<script>
module.exports = {
  data: function() {
    return { ... }
  }
}
</script>

<style>
  ...
</style>
// ------------------
<template>
  ...
</template>

<script>
  import ... from '...'

  export default {
    data() {
      return { ... }
    },
    components: { ... }
  }
</script>

<style lang="less" scoped>
  ...
</style>

// -----------------
// 测试:单元测试、组件测试、端到端测试
// 生产环境部署
规模化:
// 路由
// 推荐使用 vue-router
const NotFound = { template: '<p>Page not found</p>' }
const Home = { template: '<p>Home page</p>' }
const About = { template: '<p>About page</p>' }

const routes = {
  '/': Home,
  '/about': About
}

new Vue({
  el: '#app',
  data: {
    currentRoute: window.location.pathname
  },
  computed: {
    ViewComponent() {
      return routes[this.currentRoute] || NotFound
    }
  },
  render (h) { return h(this.ViewComponent) }
})

// 状态管理
// vuex

// 服务端渲染
// SSR
// Next.js

// 安全
// 用户提供的内容需要过滤
二、Vue3
使用:
npm init vue@latestnpm installnpm run devnpm run build
创建:
import { createApp } from 'vue'

const app = createApp({
  data() {
    return {
      ...
    }
  }
})

// 应用配置
app.config.errorHandler = (err) => {
  // 处理子组件抛出的错误
}

// 注册可用资源,注册一个组件
app.component('...', ...)

// 挂载实例
app.mout('#app')
// 可以创建多个应用实例,挂载到不同的实例上去

// 依赖提供
app.provide()

// setup
<script setup>
  ...
</script>
响应式:
// 响应式数据
const 代理对象 = reactive({ 原始对象 })
// 包装为一个带 .value 属性的 ref 对象
const 对普通值类型的引用 = ref( 普通值 )
nextTick(() => { 访问更新后的 DOM })

// 计算属性
// 期望接受一个 getter 函数,返回一个计算属性ref
// 默认只读,设置 get() set() 可读可写
// 不应有副作用:做异步请求或更改 DOM
const 计算属性 = computed(() => { return ... })

function() { ... }

// 声明周期钩子
onBeforeCreate(() => { ... })
onCreated(() => { ... })
onBeforeMount(() => { ... })
onMount(() => { ... })
onBeforeUpdate(() => { ... })
onUpdate(() => { ... })
onBeforeUnmount(() => { ... })
onUnmounted(() => { ... })

// 侦听器,只追踪明确侦听的数据源
watch(数据源, async(newValue, oldValue) => { ... })
// 立即执行回调的侦听器,在副作用期间追踪依赖
watchEffect(async () => { ... })
// 访问被 Vue 更新之后的 DOM,默认侦听器在组件更新前被调用
flush: 'post'
// 后置刷新
watchPostEffect(() => { ... })

// 访问模板引用,只在组件挂载之后可访问
// 声明一个同名得模板引用
const input = ref(null)
input.value.focus()

// 显示注册组件
components: { ... },
setup() { ... return ... }
Setup:
// 单文件组件中使用<PascalCase />的标签名,DOM 中书写模板使用<kabab-case></kabab-case>
// 单独写
<script>
  export default {
    inheritAttrs: false
  }
</script>
<script setup>
  // props 列表 编译宏命令 不需要显示导入 返回一个对象
  defineProps(['...', ...])
	// 返回的是实例对象,对象或数组需要从工厂函数产出
	const props = defineProps({...: String, ...: Number, ...: {type: String, required: true, default: ...}})

  // 编译宏命令 不需要显示导入
	defineEmits(['...'])
	// 返回一个 emit() 函数
  const emit = defineEmits(['...'])
  function ...() { emit('...') }
	defineEmits({...() { 通过返回值 true false 判断验证是否通过 }})
  const emit = defineEmits({
    // 无校验
    click: null,
    // 有校验
    sumbit: ({ email, password } => {
      ...
    })
  })
  function submitForm(email, password) {
    emit('submit', {email, password})
  }

	// v-modle.
	defineProps({
    modelValue: ...,
    modelModifiers: { ... }
  })
  defineEmits(['update:modelValue'])

  // 访问透传的 attribute
  const attrs = useAttrs()

  // 依赖注入
  // 祖先组件提供 可多次调用 提供多个
  // 建议所有数据操作都内聚在提供方,可以为数据变更提供一个函数,同时可以设置 readonly 只读
  provide('注入名', '注入值')

  // 子孙组件注入
  const ... = inject('注入名', '提供的默认值')

  // 异步组件
  const AsyncComp = defineAsyncComponent({
    () => {
    return new Promise((resolve, reject) => {
      // 服务器获取组件
      loader: () => {...}
      resolve(获取到的组件)
    },
    // 加载时使用的组件
    ...: ...,
    // 展示加载组件的延时时间
    delay: ...,
    // 加载失败后展示的组件
    ...: ...,
    // 设置超时
    timeout: ...
  })
</script>

<template>
  // 抛出一个事件 父组件监听后执行操作,没有冒泡机制
  <button @click="$emit('事件名', 额外参数)"></button>
  // 插槽 文本、元素、组件
  <slot :...="...">默认内容</slot>
	<slot name="具名插槽"></slot>
  // 透传进的值
  {{ $attrs }}
	v-bind="$attrs"
  // 多根节点不自动透传,需要显示绑定 $attrs
</template>

// -----------------------------------------
<component is:...></component>
<... v-bind="存有多个 prop 的对象" />
<template v-slot:"具名插槽"></...>
<template #"具名插槽"></...>
// 访问子作用域 支持解构
<... v-slot="slotProps"></...>
// 具名插槽作用域
<... v-slot:name="slotProps"></...>
// 异步组件
<AsyncComp />
// 组合式函数(复用相同的逻辑):抽取单独的 .js 文件,组合式函数以 use... 开头,通过返回值暴露所管理的状态
// 纯逻辑时使用组合式函数,逻辑和需要视图更新时使用基于作用域插槽的无渲染组件
//
复用代码:组件、组合式函数、自定义指令、插件
指令、插件:
// 自定义指令
// 在模板中启用 v-focus
const vFocus = {
  mounted: (el) => el.focus()
}

// 全局注册
app.directive('...', {...})

// 指令钩子和生命周期相似...

// 插件安装
app.use(myPlugin, { 可选项 })
const myPlugin = {
  install(app, options) { ... }
}
内置组件:
<Transition />
<TransitionGroup />
<KeepAlive />
<Teleport />
<Suspense />
三、代码风格
- 组件名使用多个单词,单词小写,单词间用 - 隔开。
- 组件的
data必须是一个返回对象的函数。 props要尽可能的详细,至少是要指定类型的(类型、是否必须、默认值、校验)- 使用
v-for要配合key - 避免
v-if和v-for在同一个元素上使用。 - 单文件时组件的 css 要设置
scoped指定作用域。 - 使用模块作用域保持不允许外部访问函数的私有性,为插件、混入的不考虑对外公共 API 的自定义私有属性使用
$_前缀,并附带一个命名空间。 - 使用构建系统时,把每个组件单独分成文件。
- 组件文件名一般化描述开头,描述性修饰结尾:搜索输入框 查询、设置检查 条款...
- 单文件的文件名使用大驼峰命名或单词小写,单词间用 - 隔开。
- 对于展示类无逻辑无状态的组件文件名,使用
Base、App、V开头的前缀开头。 - 不会被复用,不接受
prop的组件文件名,使用The开头的前缀开头,以示前缀。 - 父组件在某些场合下的子组件文件名,使用父组件的名作为前缀开头,紧密耦合。
- 在单文件中
<MyComponent/>,在 DOM 模板中,<my-compont></my-component> - 声明
prop时,使用小驼峰命名。 - 多个
attribute换行书写。 - 总结: JS 中使用驼峰命名,HTML 中使用 - 分隔。
:@#缩写要么都用要么都不用。
四、Vue Router
安装:
npm install vue-router@4yarn add vue-router@4
使用:
// HTML 使用
<script src="https://unpkg.com/vue@3"></script>
<script src="https://unpkg.com/vue-router@4"></script>

<div id="app">
  <h1>Hello App!</h1>
  <p>
    <!--使用 router-link 组件进行导航 -->
    <!--通过传递 `to` 来指定链接 -->
    <!--`<router-link>` 将呈现一个带有正确 `href` 属性的 `<a>` 标签-->
    <router-link to="/">Go to Home</router-link>
    <router-link to="/about">Go to About</router-link>
  </p>
  <!-- 路由出口 -->
  <!-- 路由匹配到的组件将渲染在这里 -->
  <router-view name="..."></router-view>
</div>

// ----------------------------------------

// 1. 定义路由组件.
// 也可以从其他文件导入
const Home = { template: '<div>Home</div>' }
const About = { template: '<div>About</div>' }

// 2. 定义一些路由
// 每个路由都需要映射到一个组件。
const routes = [
  { path: '/', component: Home },
  { path: '/about', component: About },
]

// 3. 创建路由实例并传递 `routes` 配置
const router = VueRouter.createRouter({
  // 4. 内部提供了 history 模式的实现。这里使用 hash 模式。
  history: VueRouter.createWebHashHistory(),
  routes, // `routes: routes` 的缩写
})

// 5. 创建并挂载根实例
const app = Vue.createApp({})
//确保 _use_ 路由实例使
//整个应用支持路由。
app.use(router)

app.mount('#app')
this.$route(当前路由)与 直接使用通过createRouter创建的router实例完全相同。
// 动态路由

// 路由匹配之后 params 的值以 this.$route.params 暴露出来

// 响应路由参数的变化
// 或使用导航守卫

// 捕获所有路由或 404 路由 使用正则表达式

// 路由匹配语法:在参数中自定义正则,可重复参数匹配0-n个参数 + *,sensitive 和 strict 控制匹配是灵活或严格的,? 可选参数

// 嵌套路由

// 编程式导航:导航到不同的位置、替换当前位置、横跨历史、篡改历史

// 命名路由

// 命名视图 components s s

// 重定向和别名,相对重定向

// 路由组件传参 props

// 不同的历史模式
const router = createRouter({
  // Hash 模式 #
  history: createWebHashHistory(),
  // HTML5 模式
  history: createWebHistory(),
})

const routes = [
  {
    path: '/.../:...',
    name: '...',
    component: ...,
    // 重定向 也可以是一个命名路由 { name: '...' } 同时也可以是一个方法
    redirect: '...',
    // 别名
    alias: '...',
    // 组件传参
    props: true,
    // 嵌套路由
    children: [
      // 上一层匹配成功时
      {
        path: '',
        component: '...',
        meta: { ... }
      },
      {
        path: '...',
        name: '...',
        component: '...'
      }
    ]
  }
]

router.push()
router.replace()
router.go()
导航守卫:
// 导航守卫:通过跳转或取消的方式守卫导航

// 全局前置守卫:
router.beforeEach(async (to, from, [next]) => { return false })
// 全局解析守卫
router.beforeResolve(async to => {})
// 全局后置钩子
router.beforeEach((to, from) => {})

router.onError()

// 路由独享的守卫:在路由配置中。只有在从不同的导航时才触发
beforeEnter:(to, from) => {}

// 组件内的守卫,可用的配置 API:beforeRouteEnter、beforeRouteUpdate、beforeRouterLeave

// 完整导航解析流程:
1、导航被触发。
2、在失活的组件里调用 beforeRouteLeave 守卫。
3、调用全局的 beforeEach 守卫。
4、在重用的组件里调用 beforeRouteUpdate 守卫(2.2+)。
5、在路由配置里调用 beforeEnter。
6、解析异步路由组件。
7、在被激活的组件里调用 beforeRouteEnter。
8、调用全局的 beforeResolve 守卫(2.5+)。
9、导航被确认。
10、调用全局的 afterEach 钩子。
11、触发 DOM 更新。
12、调用 beforeRouteEnter 守卫中传给 next 的回调函数,创建好的组件实例会作为回调函数的参数传入。

// 路由元信息 meta 附加信息:过渡名称、谁可以访问...
$route.meta()

// 数据获取:导航完成之后获取(接下来用生命周期钩子去获取数据,过程中显示加载中)、导航完成之前获取(在守卫中获取数据成功后执行导航)

// 过渡动效
使用 v-slot API
// 单个路由的过渡:元信息+动态name
// 基于路由的动态过渡
// key 强制复用过渡

// 滚动行为
scrollBehavior(to, from, savedPosition) { return { ...} }

// 路由懒加载:将静态导入替换为动态导入,进行缓存

// 导航故障
Promise

// 动态路由
router.addRoute()\ router.removeRoute()

// router.hasRoute() 检查路由是否存在
// router.getRoutes() 获取一个包含所有路由记录的数组
router是路由实例对象,route是当前正在跳转的路由对象。
五、Vuex
安装:
npm install vuex --saveyarn add vuex- 如果浏览器不支持 promise:
npm install es6-promise --save
使用:
// 安装使用
Vue.use(Vuex)

const store = new Vuex.Store({
  state: {
    count: 0
  },
  mutations: {
    increment (state) {
      state.count++
    }
  },
  actions: {
    increment (context) {
      context.commit('increment')
    }
  }
})

// 核心为 store(仓库),其中包含了应用中大部分的 state 它是响应式的,不能够直接被修改,需要显示的提交 mutation
store.state
store.commit

// State
// 单一状态数
// 在组件中以计算属性返回某个状态
// 多个状态使用 mapState
// 组件仍然具有局部状态

// Getter 相当于 store 的计算属性
// mapGetters

// Mutation
// 提交载荷 (大多数情况下应该是一个对象)
// 对象风格提交
// mutation 需要是同步函数
// 在组件中提交 mutation

// Action
// 提交的是 mutation
// 可以包含任意异步操作
// 分发 store.dispatch(''),支持载荷和对象的方式进行分发
// mapActions

// Module
// 将 store 分割为模块
六、Pinia
七、Vue CLI
01 - 安装
npm install -g @vue/cliyarn add global @vue/cli
02 - 创建项目
- 创建一个新的项目:
vue create 项目名 - 启用图形化界面:
vue ui - 启动服务:
npm run serve - 安装插件:
vue add 插件名 - 打包程序:
npm run build